
.png)
Centre Starburst Blocks - Prancing Peacock
- Babs Rudlin
- Jan 31, 2021
- 3 min read
Now I'm all organised I can begin cutting out the fabric for my first set of blocks.
I really enjoy this part as I'm scribbling in my pattern booklet and sticking in my reference fabrics as I cut up the first fabric shapes.
I'm also really looking forward to playing with my new spinning turntable. I got this wonderful cutting mat as a holiday gift from Mum, I think she really wants this quilt LOL.


So I set out my strips of fabric and cut them into the lengths needed for each of my outline templates. There's lots of fabric around the small shapes as that is whats needed for foundation piecing.
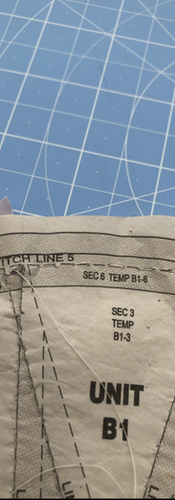
I need to do some more paper cutting to separate the individual foundation fans before I can begin.
To get organised (this is a very common theme you'll find) I sort my fabric into order, each pattern piece has a number so as long as you keep the papers clipped to the fabric you'll easily know what is sewn on when.

I realise that the fabric needs a quick press before I begin to sew as some of the fabric is still quite folded...
Normally I would wash all my fabrics before cutting, however if I did that this time I would have lost the labels added by Granny Sassy Design, who created the fabric kit for this quilt.

Now I've pressed each fabric piece I grab my glue and stick the first piece of fabric to the back of the foundation template. Now to fold the paper, cut off the excess with my trusty 1/4" rule and add the second colour fabric to the paper. Pinning in place is great but remember which way you will be sewing and point the pins in the same direction to avoid stabbing yourself. I learned this the hard way!
I don't use knots when I hand sew I lock the thread in place by sewing into the same first stitch about three times, leaving about 1/2" tail of thread. Once the first stitch is secure I work a quick running stitch. You know I'm serious as a the leather thimble has come out!
I prefer to use a plain leather thimble for the hand stitching with a coin and leather thimble for the quilting. After a while sewing through the added layer of paper, even though it's newsprint and a lighter weight, becomes something you feel in your fingers. I recommend using a fresh needle so it slides through the paper rather than pushes against it before piercing. Again this is something you will feel as you sew rather than anything you can see.
Once the units are all pinned up I work through all 8 mini blocks at the same time, almost as if I were chain sewing on a machine. It saves time in the long run and when you finally press that last seam and can cut down all 8 blocks in a single go it's really satisfying.


For this quilt I'm timing how long it takes to make, I'm guessing a LOT longer than I'm expecting, so far I've sewn the first seam and pressed and prepped the second, with maybe two blocks sewn for the second seam. It's been over an hour of work already.
Oh for goodness sake!

I guess I'm tired as this should not happen when hand sewing, so disappointed in myself. I'll call it a night and crack on tomorrow morning.
Well I lost the next day for sewing as I woke up with a migraine, I lose vision and feeling in my fingers/arms when I migraine so absolutely no sewing yesterday.
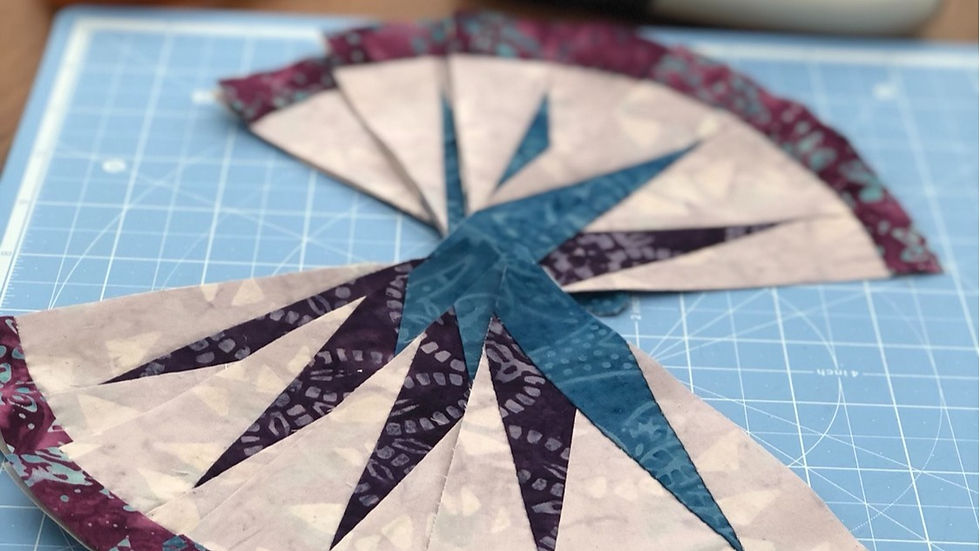
However I managed to get cracking to day and finished up the full set of 8 pieces for Unit B1.
Sewing the main body of the starburst blocks was pretty straight forward, although the first time I cut through the fabric with my add a quarter ruler is always a scary moment.


I managed to charge on through the bulk of the work in around 3 hours. However It took me a full extra hour and a half to add the final curved banding atop each of these blocks. Piecing on the curve can be confusing at the best of times but stick with the pattern and you will be fine.
Make sure to read and re-read the instructions.

The fabric appears to be impossible to fit into place but using a combination of basting, slicing away excess fabrics and lots of pinning you will create a beautiful spine for the unit.

This looks overly frilly but once the fabric is sewn in to place and pressed out it fits beautifully. I love these patterns as they are so well constructed.
In total including pinning, pressing cutting and hand sewing these units took me 4.6hrs to craft. I'm really happy with how they have turned out and will be starting on the circle of flying geese next week.


Comments