


.png)
New Year Mitten Crochet Along - Part 1
- Babs Rudlin
- Jan 5, 2021
- 3 min read

Yes we've made it in to 2021, New Year, new opportunities and new hope.
Learn more about the event, grab your supplies and get ready to crochet along with me in this FREE CAL. #NewYearsFittedMittenCAL2021
Let's take a look at what you'll be needing for this project and keep in mind the pattern is written in US terms.
SIZE
S (M, L, XL) To fit hand circumference 18 (19, 20.5, 21.5) cm / 7 (7.5, 8, 8.5)”.
FINISHED MEASUREMENTS
Hand Circumference: 14 (15, 16, 17) cm / 5.75 (6, 6.25, 6.75)”
From Base of Cuff to Top of Mitten (adjustable): All sizes – 16.5 cm / 6.5”
Cuff length (adjustable): All sizes – 4 cm / 1.5” HOOK | 4.5 mm / US 7 or size required to obtain gauge.

YARN
MAIN COLOUR (MC)
100 (105, 110, 115) m / 110 (115, 120, 125) yds of DK weight yarn.
Sample shown in Stylecraft Batik Elements DK (DK weight; 138 m/50 g; 80% Premium Acrylic, 20% Wool) in #1938 Titanium.
CONTRASTING COLOUR (CC)
19 (20, 21, 22) m / 21 (22, 23, 24) yds of DK weight yarn.
Sample shown in Sirdar Softspun DK (DK weight; 125 m/25 g; 51% Nylon, 25% Wool, 24% Acrylic) in #0550 Pearlie.
NOTIONS
Tapestry needle
3 locking st markers
GAUGE
23 sts x 20 rounds = 10 cm / 4” in SC-BLO, crochet in a spiral, after blocking.
ABBREVIATIONS
CC Contrasting Colour
Ch Chain
DC (US) Double Crochet
FPDC (US) Front Post Double Crochet Video tutorial
M Marker
MC Main Colour
PM Place marker
Rep Repeat
SC (US) Single Crochet
SC-BLO (US) Single Crochet through back loop only
Sk Skip
SL ST Slip stitch
SM Slip Marker: move marker up 1 round
Sp Space
St(s) Stitch(es)
PATTERN DIRECTIONS | CUFF
With MC, ch 30 (32, 34, 36). SL ST to join in the rnd, be careful not to twist the ch.
Set-up Rnd 1 (MC): Ch 3 (counts as first DC and ch 1), sk 1, *DC 1, ch 1, sk 1; rep from * to end of rnd.
Join with SL ST around the post of the ch 3. Pull up a long loop or put the loop on hold while working with CC to avoid losing the st.
Treat the cast-on chain as normal ch.
Join CC to the first ch sp on the cast-on, the one created by the first sk 1 on the previous rnd.
Set-up Rnd 2 (CC): Ch 3 (counts as first DC and ch 1), *DC 1 in the next ch-1 sp on the cast-on ch, ch 1; rep from * to end of rnd.

DO NOT join in the rnd.
With RS facing and CC mesh hanging down, fold the CC mesh up.

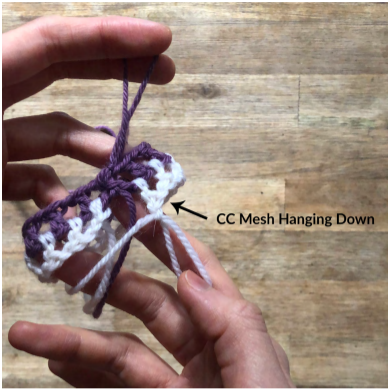

Bring MC (working yarn and the loop from the set-up rnd) to the front of work. Complete Set-up Rnd 2 by joining in the rnd with SL ST around the post of the CC ch 3 (enclosing MC).
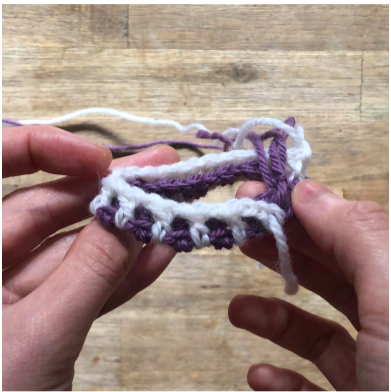
The set up sound confusing, but follow along and you'll be all set to go for the remainder of the cuff. You should have alternating colours and a clear map of where to work from now on.
All FPDC sts are worked around the same colour posts ONLY, i.e. an MC FPDC is worked around the MC post the rnd below and a CC FPDC is worked around the CC post the end below.
Rnd 1 (MC): Bring CC (working yarn and the loop from the set-up rnd) to front. Ch 3 (counts as first DC and ch 1), *FPDC 1 (pull MC DC from previous row through CC mesh), ch 1; rep from * to end of rnd. Join with SL ST around the post of the ch 3.

You will now have a round of MC grids standing above your set up rounds.
Rnd 2 (CC): Ch 3 (count as first DC and ch 1), *FPDC 1, ch1; rep from * to end of rnd. Bring MC to front. Join with SL ST around the post of the ch 3.
Work Rnds 1-2 until cuff measures 4 cm / 1.5”.
Cut CC yarn and fasten off.
That's all for week one and this is the most complex part. The inside of the cuff has horizontal stripes, which you can see below, the outside of the cuff has vertical ribbing. You can choose which you prefer before moving on the main body in part 2.

Sharing is Caring
Sharing is caring in everything that we do in our world of yarn. The more you share this event (and others) online, the more people visit the site and you help support me. That is how designers get noticed and it helps to grow reputation for the blogs you enjoy.
Feel free to share any of the images in this post to let others know about the FREE makes at babsgetscrafty.com
As we all work through the New Years Fitted Mitten CAL 2021 I ask that you use our hashtags to share and make a great gallery of what you are working on.
#NewYearsFittedMittenCAL2021 #getcraftywithbabs
I really love the texture of this cuff!