
.png)
Fast Knitted Headband - Free Pattern
- Babs Rudlin
- Dec 21, 2020
- 3 min read

A lovely and speedy knit – this headband can be completed in an evening for an experienced knitter or two for a beginner.
Which makes it a perfect 'Quickie Gift'
The headband can be made in any size for children or adults, if you are making for a babe under 3 yrs) please don’t add the button as this could prove to be a choking hazard.

The pattern below shows you how to start, the cabling pattern which repeats until the band is the length you need (my head is ridiculously small for example) and how to finish the whole headband with a decorative button. The headband I created for myself also fits my daughter, please take a measurement for yourself to be sure of sizing.
I used…Stylecraft Aran Ombre in the shade Tribal, with a large black button to finish.
The headband is made from a repeating pattern of 4 x 4 blocks of alternating knit and purl and two mirrored strips of cable edged with a plain knitted band.
What You Need:
Ball of wool 100g Aran weight (10ply) in you choice of colour way.
3.75mm needles
Cable needle (or any other knitting needle you have to hand)
Wool Needle
Buttons – for an embellishment
Instructions:
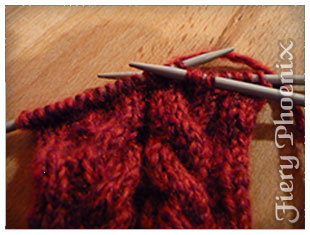
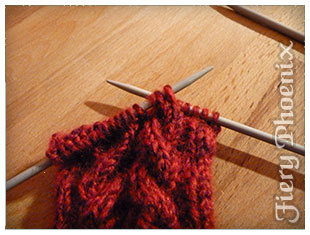
How to Cable To the Left:
Slip 3 stitches onto the spare needle, bring them to the front of your work (pic 1)
Knit three stitches
Slip the three stitches from the spare needle onto the left needle (pic 2)
Knit these stitches as normal
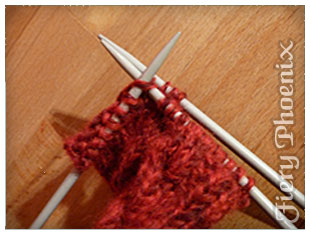
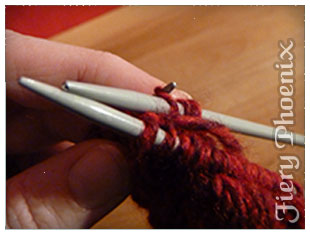
How To Cable To the Right:
Slip 3 stitches onto the spare needle, bring them to the back of your work (pic 1)
Knit three stitches
Slip the three stitches from the spare needle onto the left needle (pic 2)
Knit these stitches as normal
You will measure the final length by wrapping around your head, or by matching your head measurement. If by measurement take this now!
Start Knitting Your Headband
Cast on 24 stitches
(RS) Knit 24
(WS) Purl 24
(RS) K3, P2, K6, P2, K6, P2, K3
(WS) P3, K2, P6, K2, P6, K2, P3
(RS) K3, P2, K6, P2, K6, P2, K3
(WS) P3, K2, P6, K2, P6, K2, P3
The above rows form the first edging blocks which repeat over 4 rows, now onto the start of the cabling which repeats over 6 rows
*K5, Cable3 to front (C3F), P2,Cable 3 back (C3B), K5
P11, K2, P11
K11, P2, P11
P11, K2, P11
The second edging block is now complete. The next cable will take place half way through this next edging block and so on.

K3, P2, K6, P2, K6, P2, K3
P3, K2, P6, K2, P6, K2, P3
K3, P2, C3F, P2, C3B, P2, K3
P3, K2, P6, K2, P6, K2, P3
K11, P2, K11
P11, K2, P11
K11, P2, K11
P11, K2, P11
K3, P2, C3F, P2, C3B, P2, K3
P3, K2, P6, K2, P6, K2, P3

K3, P2, K6, P2, K6, P2, K3
P3, K2, P6, K2, P6, K2, P3
K11, P2, K11
P11, K2, P11
K5, C3F, P2, C3B, K5
P11, K2, P11
K3, P2, K6, P2, K6, P2, K3
P3, K2, P6, K2, P6, K2, P3
K3, P2, K6, P2, K6, P2, K3
P3, K2, P6, K2, P6, K2, P3*
This completes the final set of edging blocks to complete the repeating pattern. Simply repeat the rows between the * until the headband has reached your desired length, ending with a wrong side row (edged with Purl stitches).
Finish the Headband by casting off in knit.

Join the two ends together, I use a serger as I struggle to complete a neat hand sewn join with my wool needle. Attach your button embellishment and there you have a completed cable headband.

If you want to see a video tutorial for this pattern please let me know in the comments below.
Sharing is Caring
Sharing is caring in everything that we do in our world of yarn. The more you share this free pattern online, the more people visit the site and you help support me. That is how designers get noticed and it helps to grow reputation for the blogs you enjoy.
#getcraftywithbabs


Comments